Product Description
1.Small radial dimension and large bearing capacity are commonly used in shafting transmission under low speed and heavy load conditions.
2.It can compensate the relative offset of 2 axes in a certain angle and work long distance with the middle axle.
3.It is suitable for connecting horizontal 2 coaxial axes and driving shafting with a certain angle displaceme
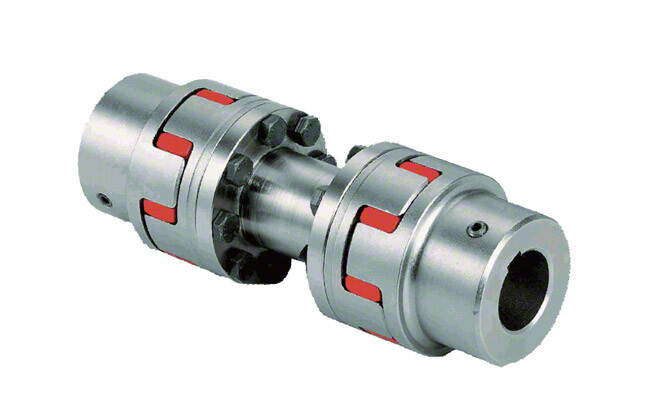
Drum gear coupling, drum tooth is the external teeth made into a spherical, spherical center in the gear axis, side clearance than the general gear. The drum gear coupling can allow a larger angular displacement than the straight gear coupling. Moreover, the contact condition of the teeth is improved, so that the ability of transmitting torque is improved, and the service life of the coupling is prolonged. If the drum gear coupling to ensure safe and reliable work, good lubrication is essential, in exchange for slow wear. The high-speed drum-type gear coupling is mostly lubricated by lubricating oil, which needs to be filtered by high-precision oil filter, the filtrate is less than 10 microns, and the tooth surface requires continuous lubrication, otherwise the tooth surface temperature will increase and will accumulate moisture and dirt. Some high-speed drum-shaped gear couplings sometimes use the structure of oil-collecting groove hole, that is, the oil-collecting groove is processed in the outer gear shaft hole, and the oil hole which is communicated with the oil-collecting groove is drilled at the bottom of the outer gear groove, in order to make it fully lubricated, we rely on the drum-type tooth coupling high-speed operation of the centrifugal force, will be injected into the internal and external teeth mesh. Under the condition of angular displacement and stress concentration, the contact condition of the inner and outer teeth is improved by extrusion of the edge of the straight tooth, so that the friction and wear of the tooth surface are reduced and the noise is reduced. Under the same conditions, the load-carrying capacity of the drum-type gear coupling is increased by 15 -20% on average compared with the straight-type gear coupling in terms of the outer diameter of the inner gear sleeve and the maximum outer diameter of the coupling.
/* January 22, 2571 19:08:37 */!function(){function s(e,r){var a,o={};try{e&&e.split(“,”).forEach(function(e,t){e&&(a=e.match(/(.*?):(.*)$/))&&1
Is It Possible to Replace a Shaft Coupling Without Professional Assistance?
Yes, it is possible to replace a shaft coupling without professional assistance, especially if you have some mechanical knowledge and the necessary tools. However, the ease of replacement can vary depending on the type of coupling and the complexity of the equipment. Here are some general steps to guide you through the process:
1. Safety First:
Before starting any work, ensure that the equipment is turned off and disconnected from the power source. Use appropriate personal protective equipment (PPE) to protect yourself from potential hazards.
2. Assess the Coupling Type:
Different types of couplings may have specific installation and removal methods. Identify the type of coupling you need to replace, and consult the manufacturer’s documentation or online resources for guidance.
3. Gather Tools and Materials:
Collect the necessary tools, such as wrenches, sockets, and a puller (if required), to safely remove the old coupling. Have the new coupling ready for installation, ensuring it matches the specifications of the old one.
4. Disassembly:
If your coupling is a split or clamp-style coupling, you may be able to replace it without fully disassembling the connected equipment. Otherwise, you may need to remove other components to access the coupling.
5. Remove Fasteners:
Loosen and remove any fasteners, such as set screws, that secure the old coupling to the shafts. Take care not to damage the shafts during this process.
6. Extraction:
If the old coupling is tightly fitted on the shafts, you may need to use a coupling puller or other appropriate extraction tools to safely remove it.
7. Clean and Inspect:
After removing the old coupling, clean the shaft ends and inspect them for any signs of damage or wear. Also, check for any misalignment issues that may have contributed to the old coupling’s failure.
8. Install New Coupling:
Follow the manufacturer’s instructions for installing the new coupling. Apply appropriate lubrication and ensure the coupling is correctly aligned with the shafts.
9. Fasten Securely:
Tighten the fasteners to the manufacturer’s recommended torque values to securely attach the new coupling to the shafts.
10. Test Run:
After installation, perform a test run of the equipment to ensure the new coupling operates smoothly and without issues.
While it is possible to replace a shaft coupling without professional assistance, keep in mind that some couplings and equipment may require specialized knowledge and tools for safe and proper replacement. If you are uncertain about the process or encounter any difficulties, it is advisable to seek help from a qualified professional or technician to avoid potential damage to the equipment or injury to yourself.
“`
How to Identify Signs of Wear or Failure in a Shaft Coupling
Regular inspection and monitoring are essential to identify signs of wear or potential failure in a shaft coupling. Detecting issues early can help prevent costly downtime and equipment damage. Here are common signs to look for:
1. Visible Damage:
Inspect the coupling for visible signs of damage, such as cracks, chips, or deformation. These can indicate mechanical stress or overload.
2. Abnormal Noise or Vibration:
Unusual noise or excessive vibration during operation may indicate misalignment, worn-out components, or a coupling nearing its failure point.
3. Increased Temperature:
If the coupling becomes noticeably hotter during operation than usual, it could be a sign of friction or misalignment issues.
4. Shaft Misalignment:
Check for misalignment between the shafts connected by the coupling. Misalignment can lead to increased stress on the coupling and its components.
5. Excessive Backlash:
If the coupling exhibits too much free play or rotational play before torque transmission, it might indicate wear or fatigue in the coupling’s components.
6. Lubrication Issues:
Inspect the coupling for lubrication leaks or insufficient lubrication, which can lead to increased friction and wear.
7. Elastomeric Element Deterioration:
If the coupling uses elastomeric elements (e.g., rubber or polyurethane), check for signs of deterioration, such as cracking, softening, or deformation.
8. Bolts and Fasteners:
Examine the bolts and fasteners connecting the coupling components. Loose or damaged bolts can lead to misalignment and coupling failure.
9. Age and Service Life:
Consider the age and service life of the coupling. If it has been in use for a long time or exceeds the manufacturer’s recommended service life, it may be more susceptible to wear and failure.
10. Abnormal Performance:
Monitor the overall performance of the connected equipment. Any abnormal behavior, such as reduced power transmission or erratic operation, could be indicative of coupling issues.
If any of these signs are observed, it’s crucial to take immediate action. Depending on the severity of the issue, this may involve replacing worn components, realigning the shafts, or replacing the entire coupling. Regular maintenance and periodic inspections are key to identifying these signs early and ensuring the coupling operates optimally and safely.
“`
Best Practices for Installing a Shaft Coupling for Optimal Performance
Proper installation of a shaft coupling is crucial for ensuring optimal performance and preventing premature wear or failure. Follow these best practices to install a shaft coupling correctly:
1. Shaft Alignment:
Ensure that both the driving and driven shafts are properly aligned before installing the coupling. Misalignment can lead to increased stress on the coupling and other connected components, reducing efficiency and causing premature wear. Use alignment tools, such as dial indicators or laser alignment systems, to achieve accurate shaft alignment.
2. Cleanliness:
Before installation, clean the shaft ends and the coupling bore thoroughly. Remove any dirt, debris, or residue that could interfere with the coupling’s fit or cause misalignment.
3. Lubrication:
Apply the recommended lubricant to the coupling’s contact surfaces, such as the bore and shaft ends. Proper lubrication ensures smooth installation and reduces friction during operation.
4. Correct Fit:
Ensure that the coupling is the correct size and type for the application. Use couplings with the appropriate torque and speed ratings to match the equipment’s requirements.
5. Fastening:
Use the recommended fastening methods, such as set screws or keyways, to securely attach the coupling to the shafts. Make sure the fasteners are tightened to the manufacturer’s specifications to prevent loosening during operation.
6. Spacer or Adapter:
If required, use a spacer or adapter to properly position the coupling on the shafts and maintain the desired distance between the driving and driven components.
7. Avoid Shaft Damage:
Be careful during installation to avoid damaging the shaft ends, especially when using set screws or other fastening methods. Shaft damage can lead to stress concentrations and eventual failure.
8. Check Runout:
After installation, check the coupling’s runout using a dial indicator to ensure that it rotates smoothly and without wobbling. Excessive runout can indicate misalignment or improper fit.
9. Periodic Inspection:
Regularly inspect the coupling and its components for signs of wear, misalignment, or damage. Perform routine maintenance as recommended by the manufacturer to prevent issues from worsening over time.
10. Follow Manufacturer’s Guidelines:
Always follow the manufacturer’s installation instructions and guidelines. Different types of couplings may have specific installation requirements that need to be adhered to for optimal performance and safety.
By following these best practices, you can ensure that your shaft coupling is installed correctly, maximizing its efficiency and reliability in your mechanical power transmission system.
“`

editor by CX 2024-05-09
by
Tags:
Leave a Reply